
Hello everyone! It's time again for a small blog post. Today I'm going through all git commands that I regularly use in my coding projects. In this tutorial, I'm assuming that you never used git before. So feel free to skip the fundamental parts. For that, you can use my table of contents. Just click on the desired topic, and enjoy reading it. Let's get started!
What is Version Control?
Imagine you are currently working on a new python project. After you've written your first lines of code, you save the file under the name "first version" and decide to work on the project tomorrow. On the next day, you continue to add new lines of code to the file, but you completely screw it up. The whole script is not working anymore, and you get to the point where you just want to burn this version and get back to the previous one. Thankfully, you set up git in your project, which version controls your code files. This means you can easily roll back to earlier versions of your project if you happen to screw up some things in your code files.
Pretty cool 😎.
So git basically helps you to keep control over your project versions.
How to Setup Git for Your Project
To set up git for your project, you have to navigate to your project's folder via the command line.
For those who are new to bash, by using the command cd, you can dive into folders. Simply write cd, and then the name of the folder you want to enter.
To list all folders and files in a directory, type ls. The rest you can find out by yourself ;)
Assuming you reached your projects folder, use the following command to initialize git.
git init
Congratulations 🥳, you've just created your first git repository. If you want to see the .git, just type ls -a. This will list all files and folders, including the hidden ones like the .git file.
Now the question is, how can we start tracking our files in our working directory (this is where your project files are located) using our previously initialized .git repository.
How to Track Files and Commit Them to the Git Repository
If you type the following command
git status
into your command-line tool, you will get a list of untracked files. To add them to the staging area, you use the command git add followed by the name of the files you want to add. If you want them all in your staging area, simply add a dot after "add" (git add .).
After adding the files to the staging area, it's time to commit them to the git repository. For that, you write git commit -m "commit message". Inside the quotation marks, you usually write what has changed. This will be very helpful at a later point since you can always check what you've done in the previous versions.
If you are interested in what commits you have made, you can use the git log. This command will list a history of all your commits.
What is the staging area?
This is basically the meta state between untracked and committed files. Sometimes you don't want all your files to be tracked or to be committed. The staging area is the place where you can define which files should be ignored and which not.
How to Check the Differences Between Two Versions
Before we look at how we can travel back in time with git, I'll show you something else first. With git diff filename you can check which changes were made to that file compared to the previous version. This is especially interesting when you want to go back to earlier commits.
So how can you do this?
For that, you use git checkout filename. With this command, you can reset your file to the previous version.
In the next section, I'll introduce you to GitHub. GitHub is a platform that will host your local repository. This will be very practical when collaborating in a team or when making your project publicly available. Actually, lots of developers are using GitHub as a "Show-off" place for their projects. Maybe you want to do the same.
How to Set Up a Remote Repository on GitHub
As I said, Github is a place where you can host and review your code, manage projects, and build software alongside millions of other developers. To get started, you need to have an account first. For that, just go to https://github.com, and sign up for an account. It's completely free to use. Be sure to confirm your email after signing up. After that, sign in with your newly created account details.
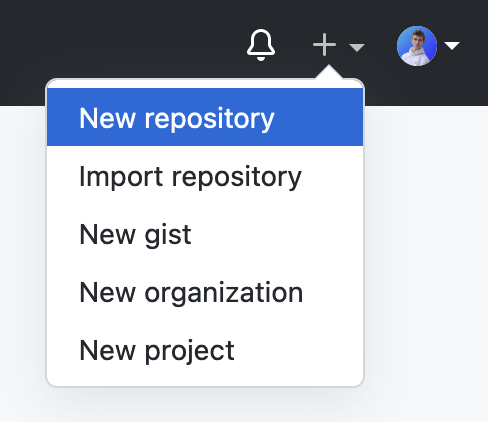
Ready? Cool. To create a new remote repository, go to the top right corner, hit the plus button, and select New Repository.
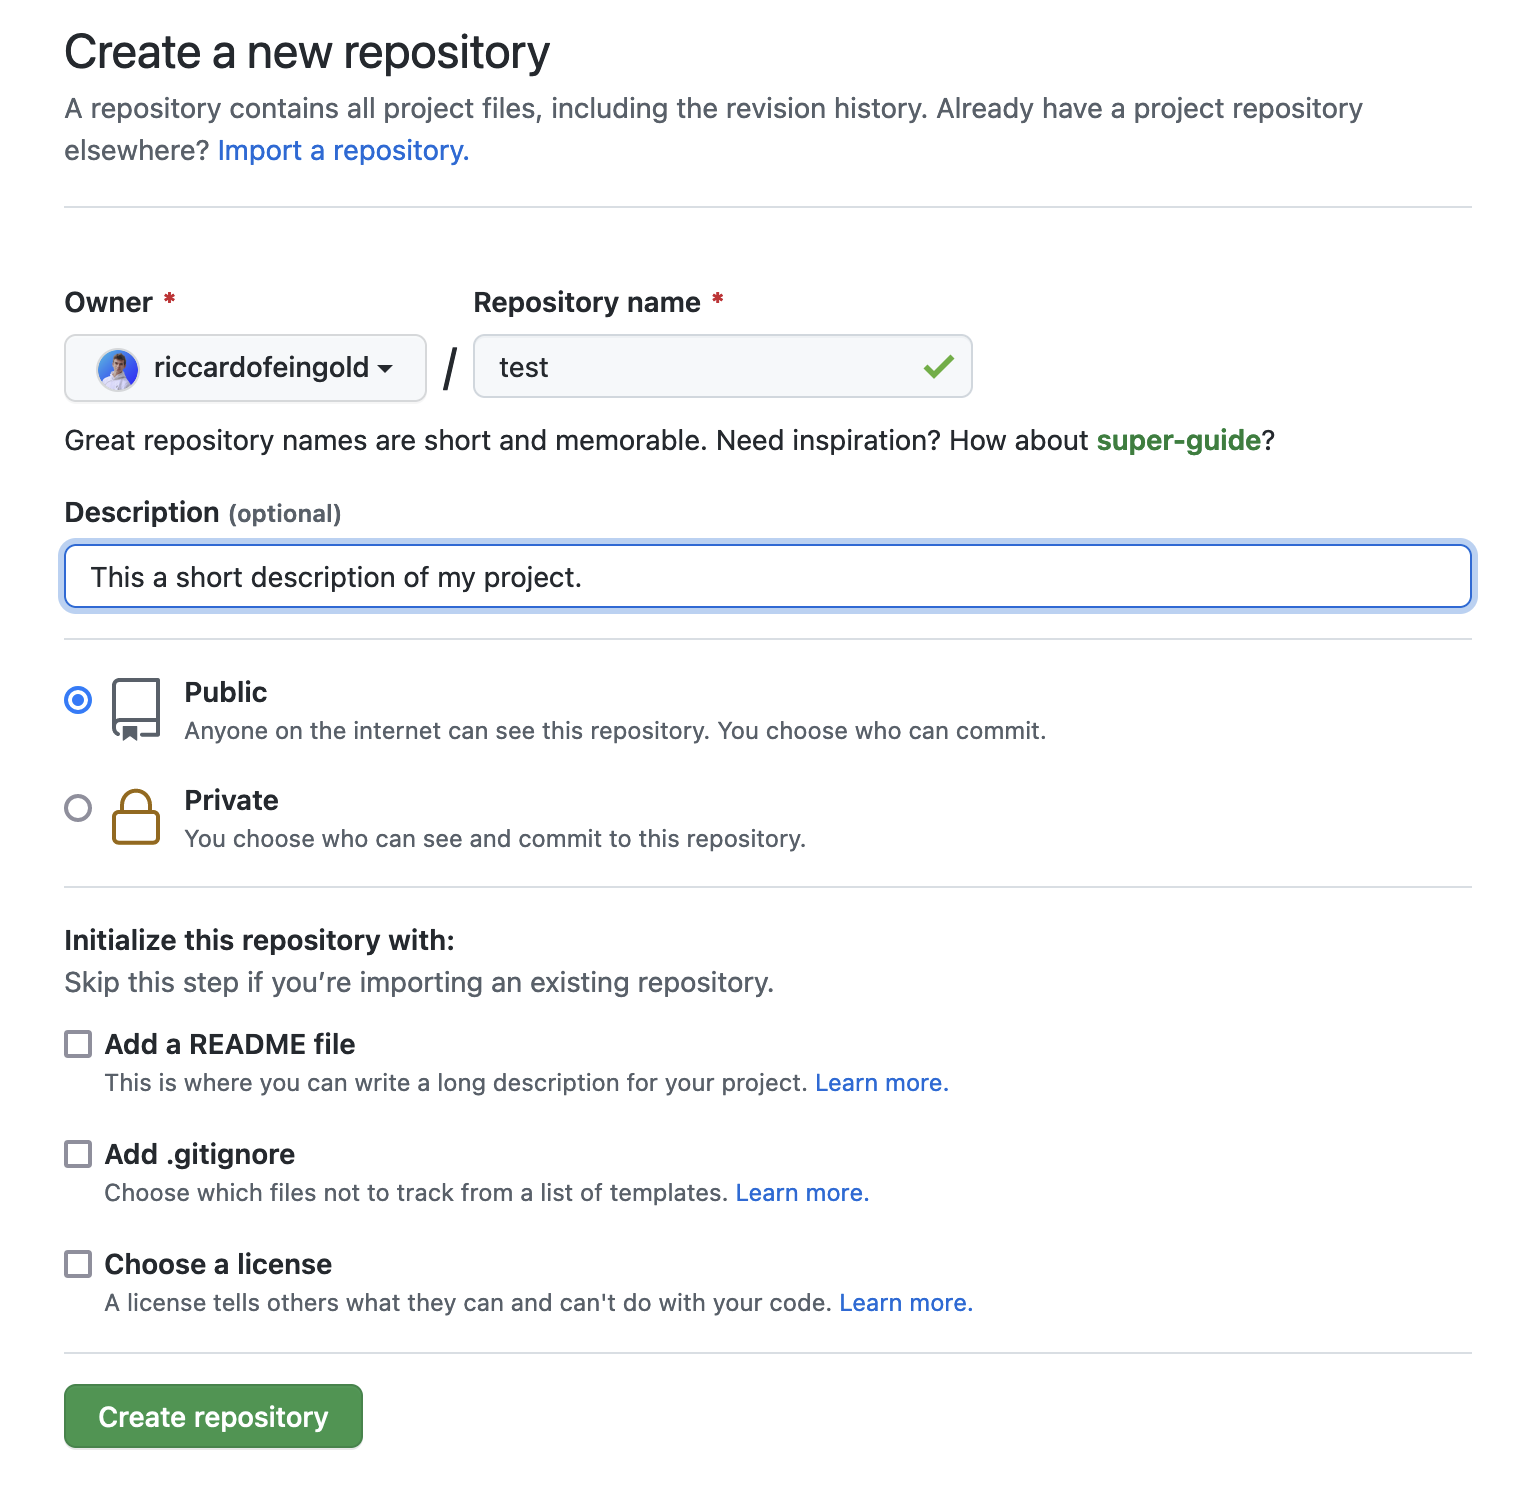
Next, name your repository. If you want, you can add a description to your project. Then, decide whether you want your code to be public or private.
When working on secret projects, it's recommended to make your remote repository private. In all other cases, you can make it public. For portfolio purposes, it's definitely better to make your project public.
At the bottom of the page, you can create a README.md file for this repository. Don't initialize this file because we'll import an existing repository (namely our's from our computer). Otherwise, you'll have an issue merging your local repository with your remote one. I'll come back later to this.
If you got all settings set, hit the green button to create your remote repository.
Now, you have a remote repository on GitHub. The next step would be to upload your local repository to your remote one. This is what we are going to look at next.
How to Push an Existing Repository onto GitHub
To push your local repository onto your remote one, you need to copy the link to your GitHub repository that you've just created. The link should look like this:
https://github.com/><username>/<repository-name>.gitIn my case:
https://github.com/riccardofeingold/test.gitNow, go back to your command-line tool - be sure that you're inside your working directory.
If you type pwd, you get your current location, and with open . you can open up Finder at this current location (the last command works only on mac).
Now, we tell our local repository that we've created a remote repository on GitHub where it can push its files onto. To do that, we write the following command:
git remote add origin <https://github.com/riccardofeingold/test.git>
So, this command creates a remote named origin which is located at the specified URL. Basically, you can name your remote repository anything you want. But most developers use origin, and I recommend you to do that as well. It's like a convention among all GitHub users.
Now, we can push our local repository onto our remote one with the following command:
git push -u origin master
The keyword master stands for the name of the main branch. This is usually where your stable version of your code will exist. We'll look at branches later in this tutorial.
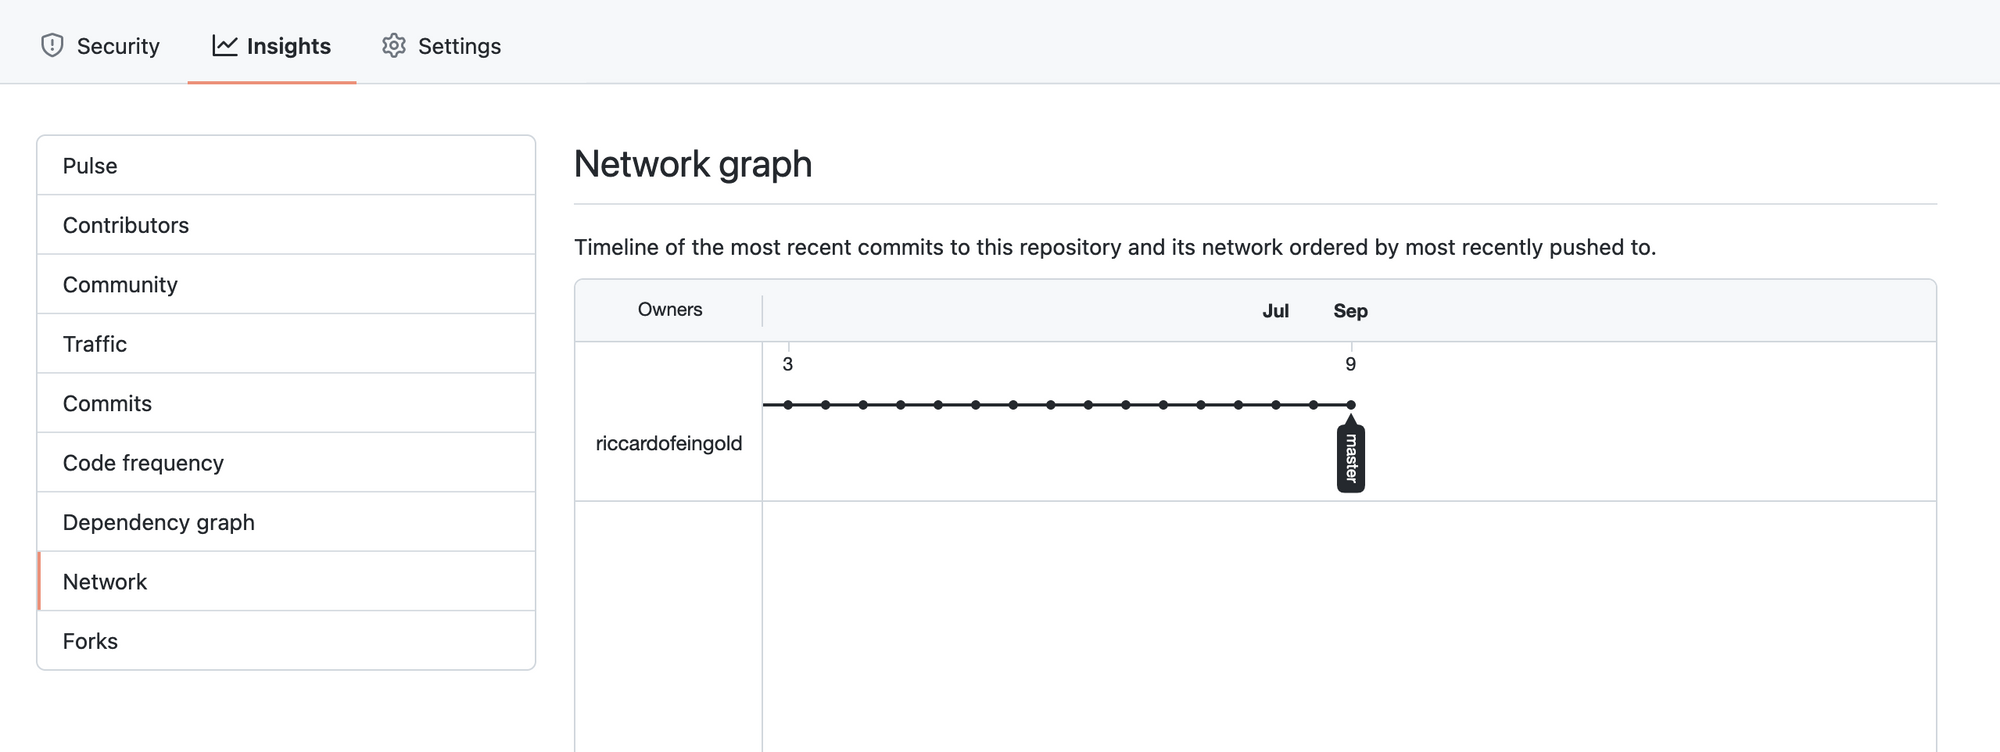
If you head over to your repository on GitHub, you should now see all your files uploaded. Under Insights and then Network, you can view your master branch, including all your commits.
In the next section, we are going to look at the .gitignore file. This file lets you define which parts of your working directory get committed and finally uploaded.
Gitignore
You've probably already asked yourself what you should do if you have files you don't want to upload to GitHub. There are actually two reasons why you want to control that.
First, sometimes you have files that contain information like API keys. These kinds of information don't belong to a place like GitHub, because such pieces of information make your code more vulnerable to exploits.
Second, in your working directory, you've got some files that store your local settings or your user preferences. A common one among Mac users is the .DS_Store file. This is a file that has completely nothing to do with the functionality of your web app. It simply stores the order of your files in Finder, as well as some other stuff I'm not aware of. These kinds of files just make your GitHub repository look messy and ugly, simply because they're useless for the person who wants to check out your code.
So, how do we create such a file?
First, let's create a new file via the command-line tool. Type the following command:
touch .gitignore
Now, inside this file, you can write all the files and folders that Git should ignore. Here's a small example:
# ignore all .a files
*.a

# but do track lib.a, even though you're ignoring .a files above
!lib.a

# only ignore the TODO file in the current directory, not subdir/TODO
/TODO

# ignore all files in any directory named build
build/

# ignore doc/notes.txt, but not doc/server/arch.txt
doc/*.txt

# ignore all .pdf files in the doc/ directory and any of its subdirectories
doc/**/*.pdf
Often, you don't want to write this all by yourself. I recommend you to search for gitignore templates and adjust these files according to your needs. E.g. on my website, I've published a gitignore template specifically for python projects.
If you've created that file right from the beginning before you even committed something with git, then you won't have any problems. But let's say you added that file to an existing repository. In that case, the gitignore file is not ignoring the files that have already been committed.
So, how do we solve that?
Gitignore File not Working
The files and folders in your version control won't just delete themselves because you've added a gitignore file to your working directory. They are already in your repository, and you have to remove them. You can do this with:
Remember to commit everything before you do this.
git rm -rf --cached .
git add .
This will remove the files and folder from your repository and add them back - this time respecting the rules in your gitignore file.
After that, commit everything and push it onto GitHub, and everything should be working now as supposed.
How to Clone GitHub Repositories
With git clone, you can clone any GitHub repository with all its commits to your working directory. Let's see how it's done in action.
First of all, you need the link to the repository. You can find that by clicking on the green button on the repository's page. Then select HTTPS.
Next, open up your terminal, and enter the following command:
git clone <https://your-link-to-the-repository.git>
The repository will be cloned to the directory where you've run this command.
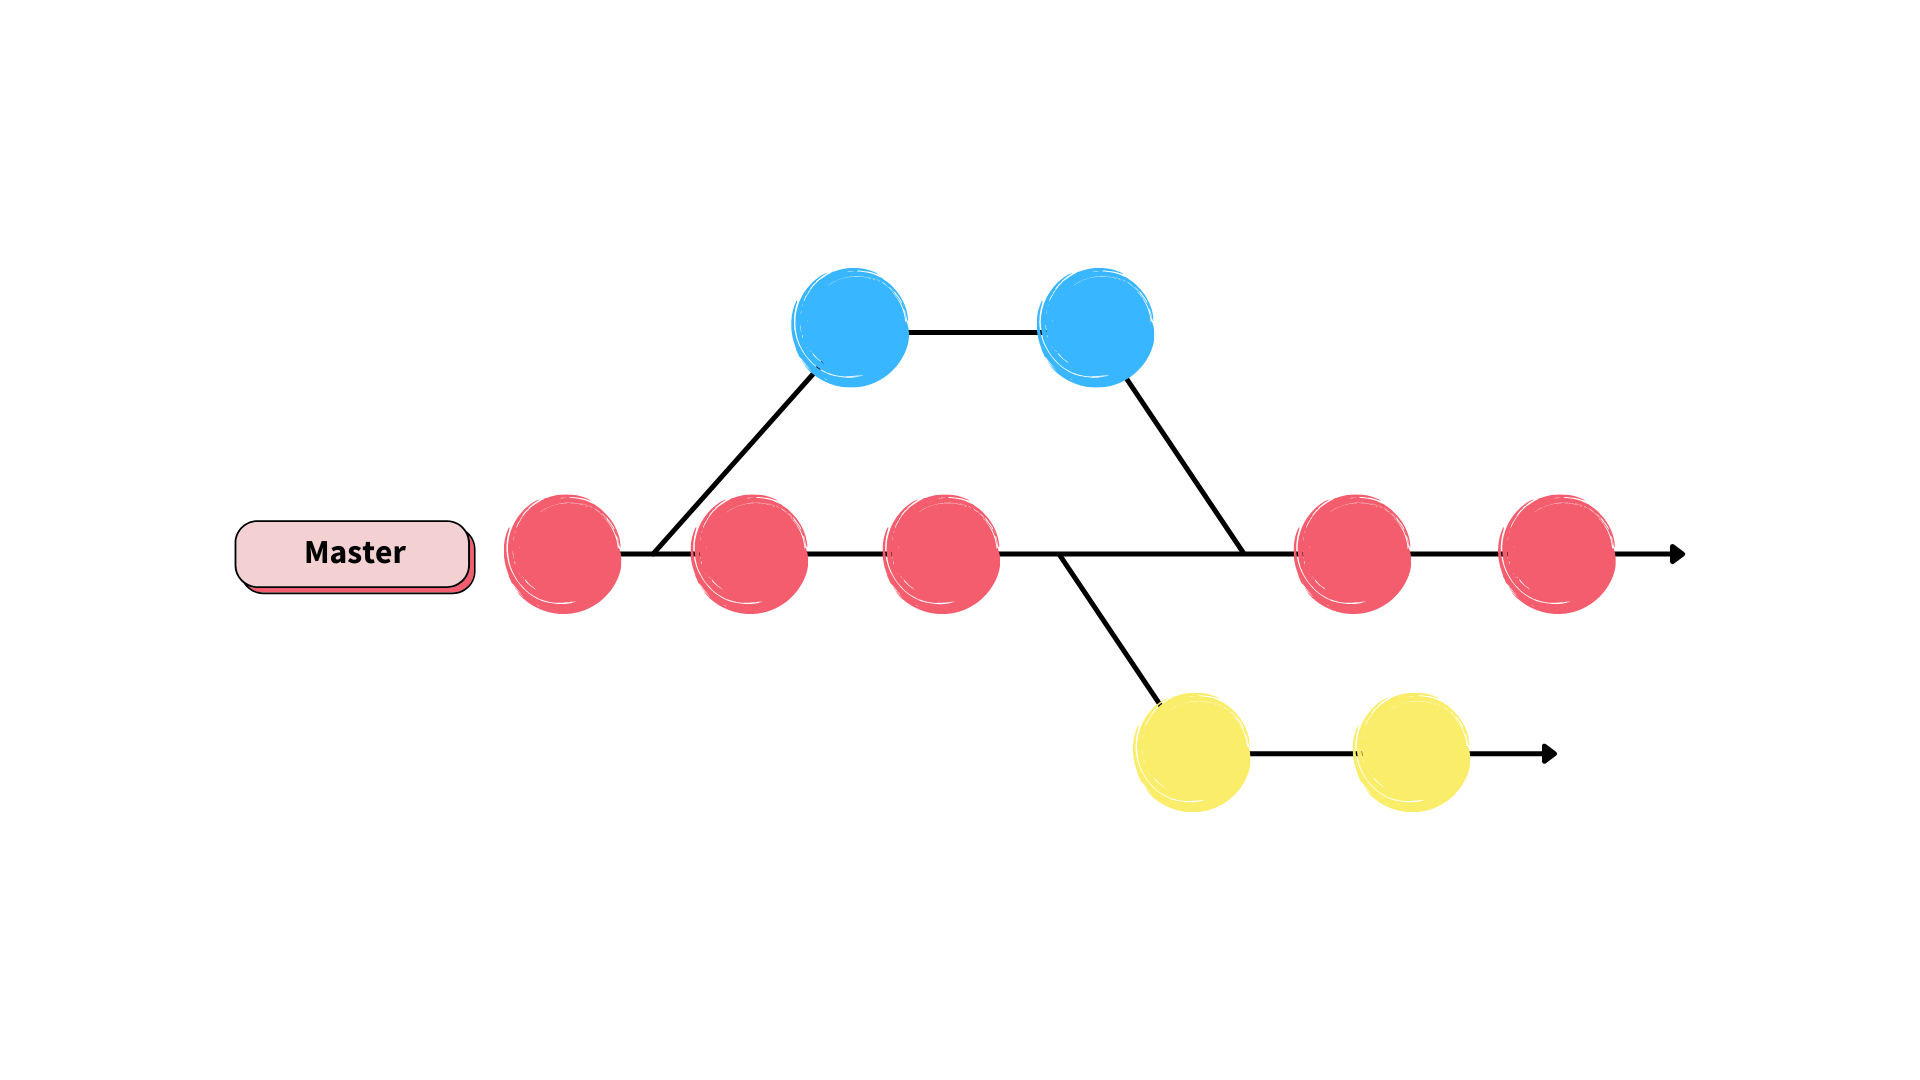
How to Create Branches Using Git
First of all, what is branching? Let's say you want to test a new technology inside your web app. But you don't want to mess up your hard-coded stuff on your master branch. So you create a new branch. Everything done on this branch won't affect the master branch. That's, what we're looking for. To illustrate things up, here you have a small diagram.
This is how the command looks:
git branch name-of-your-new-branch
By typing only git branch, you'll get a list of all the created branches.
To enter a branch, type git checkout and then the name of the branch. Now, you're ready to go!
In the next section, I'm going to explain how you can merge two branches.
How to Merge Branches Using Git
To merge two branches, you first need to go back to the master branch with git checkout. As soon as you are inside your master branch, use the merge command as follows:
git merge name-of-branch-you-want-to-merge
This will open up vim, which is a text editor for command-line tools. Here it asks you to write a merge message which you can leave empty. Type
:wq
to save the file and quit vim. Done! With git log, you can check the commits of the master branch.
How to Delete a Git Branch Both Locally and Remotely
For the fast readers, you find the code snippet below.
// delete branch locally
git branch -d localBranchName

// delete branch remotely
git push origin --delete remoteBranchName
When to Delete Branches
As we learned in the previous sections, branches are a great way to work on new features and fixes while isolating the new code from the main codebase.
Once work is done on a feature, it is often recommended to delete the branch.
The “fatal: refusing to merge unrelated histories” Git error
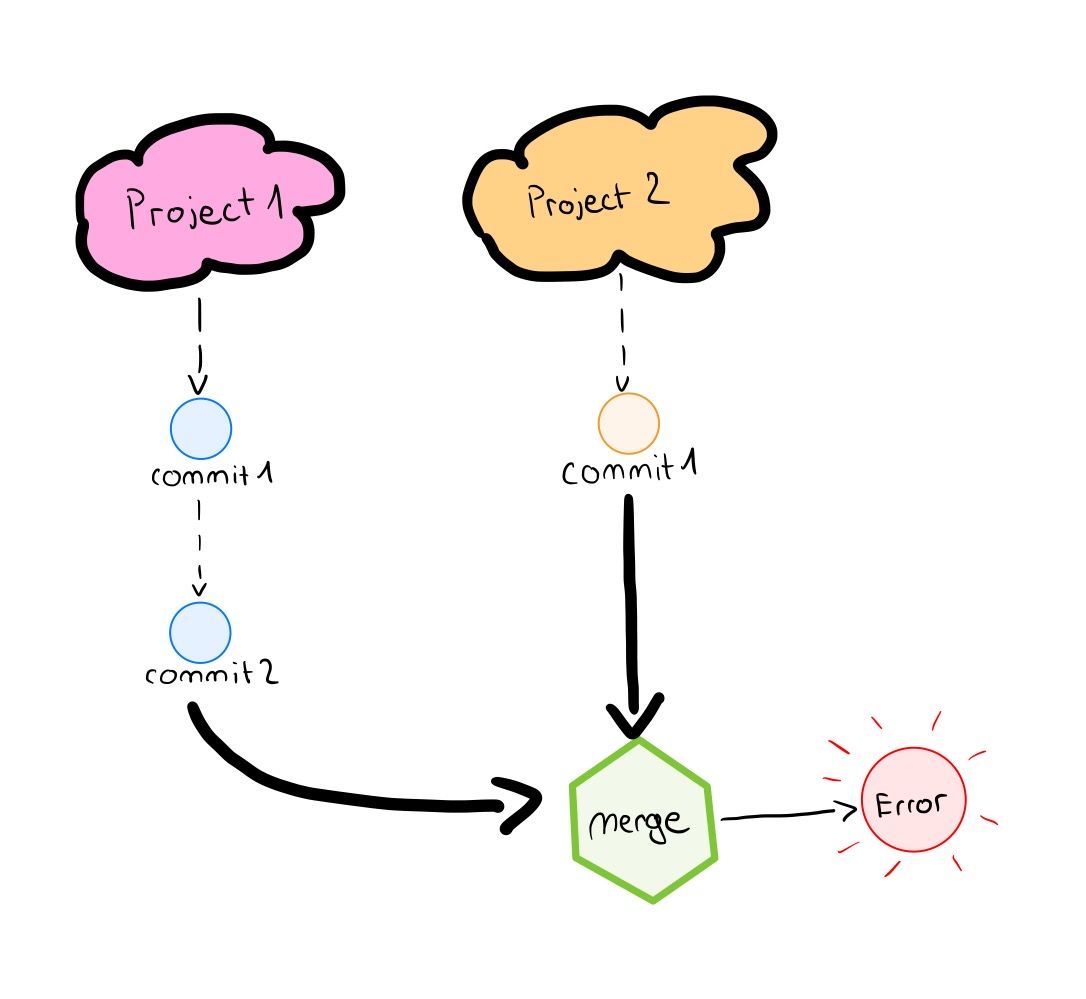
The “fatal: refusing to merge unrelated histories” Git error occurs when you try to merge two unrelated projects. This happens, for instance, when you've created a new repository on GitHub, added a few commits to it, and now you're trying to pull from a remote repository that already has some commits of its own.
The solution is to toggle the allow-unrelated-histories switch. Add this tag after a git pull or git merge command.
git pull origin master --allow-unrelated-histories
or
git merge origin master --allow-unrelated-histories
GitHub Forks and Pull Requests
In this last section, I want to talk about forks and pull requests on GitHub. These are both two tools that you mainly use when you are collaborating with others on a project.
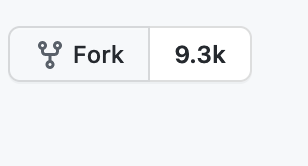
First of all, what is forking? Let's say you're working on an exciting game project, and one of your friends would like to try out some new features. Instead of giving him your account details for your GitHub repository, he can fork your game project. By doing so, he gets a copy of your project onto his GitHub account. With this copy, he can do whatever he wants without destroying your game.
To fork a repository, you just need to press the fork button at the top right, and that's it.
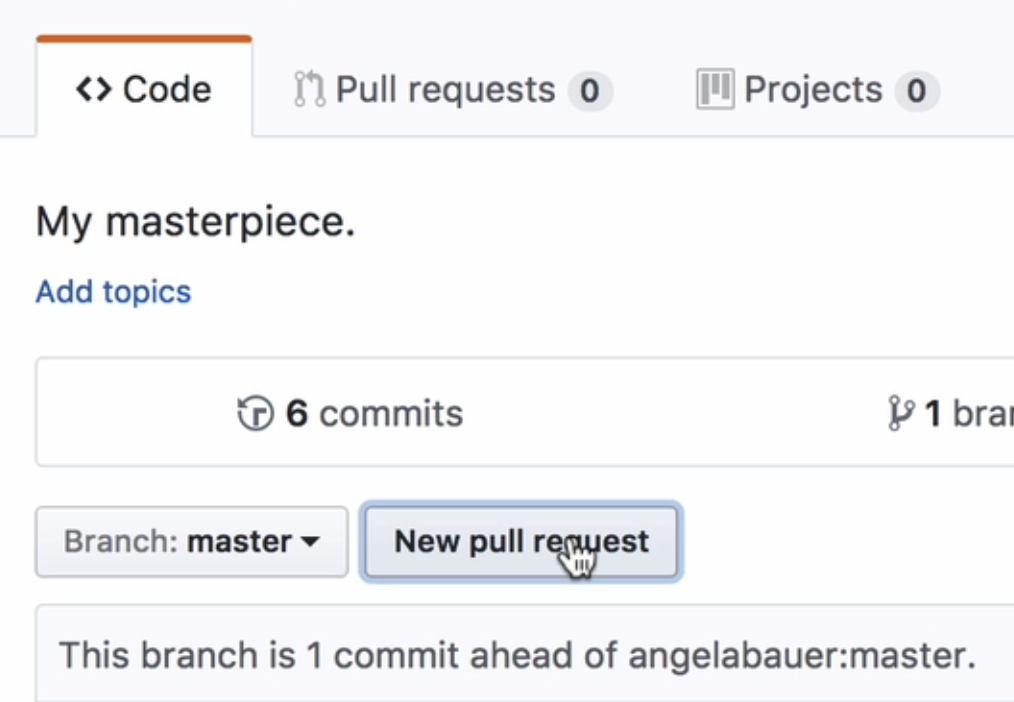
Let's get back to the story. Your friend managed to implement the new features, and now he's making a pull request to your repository. At this point, you can decide if you want to pull his commits over to your game project or not. Here too, you can achieve a pull request by clicking on the button pull request, which you can find in the code section.
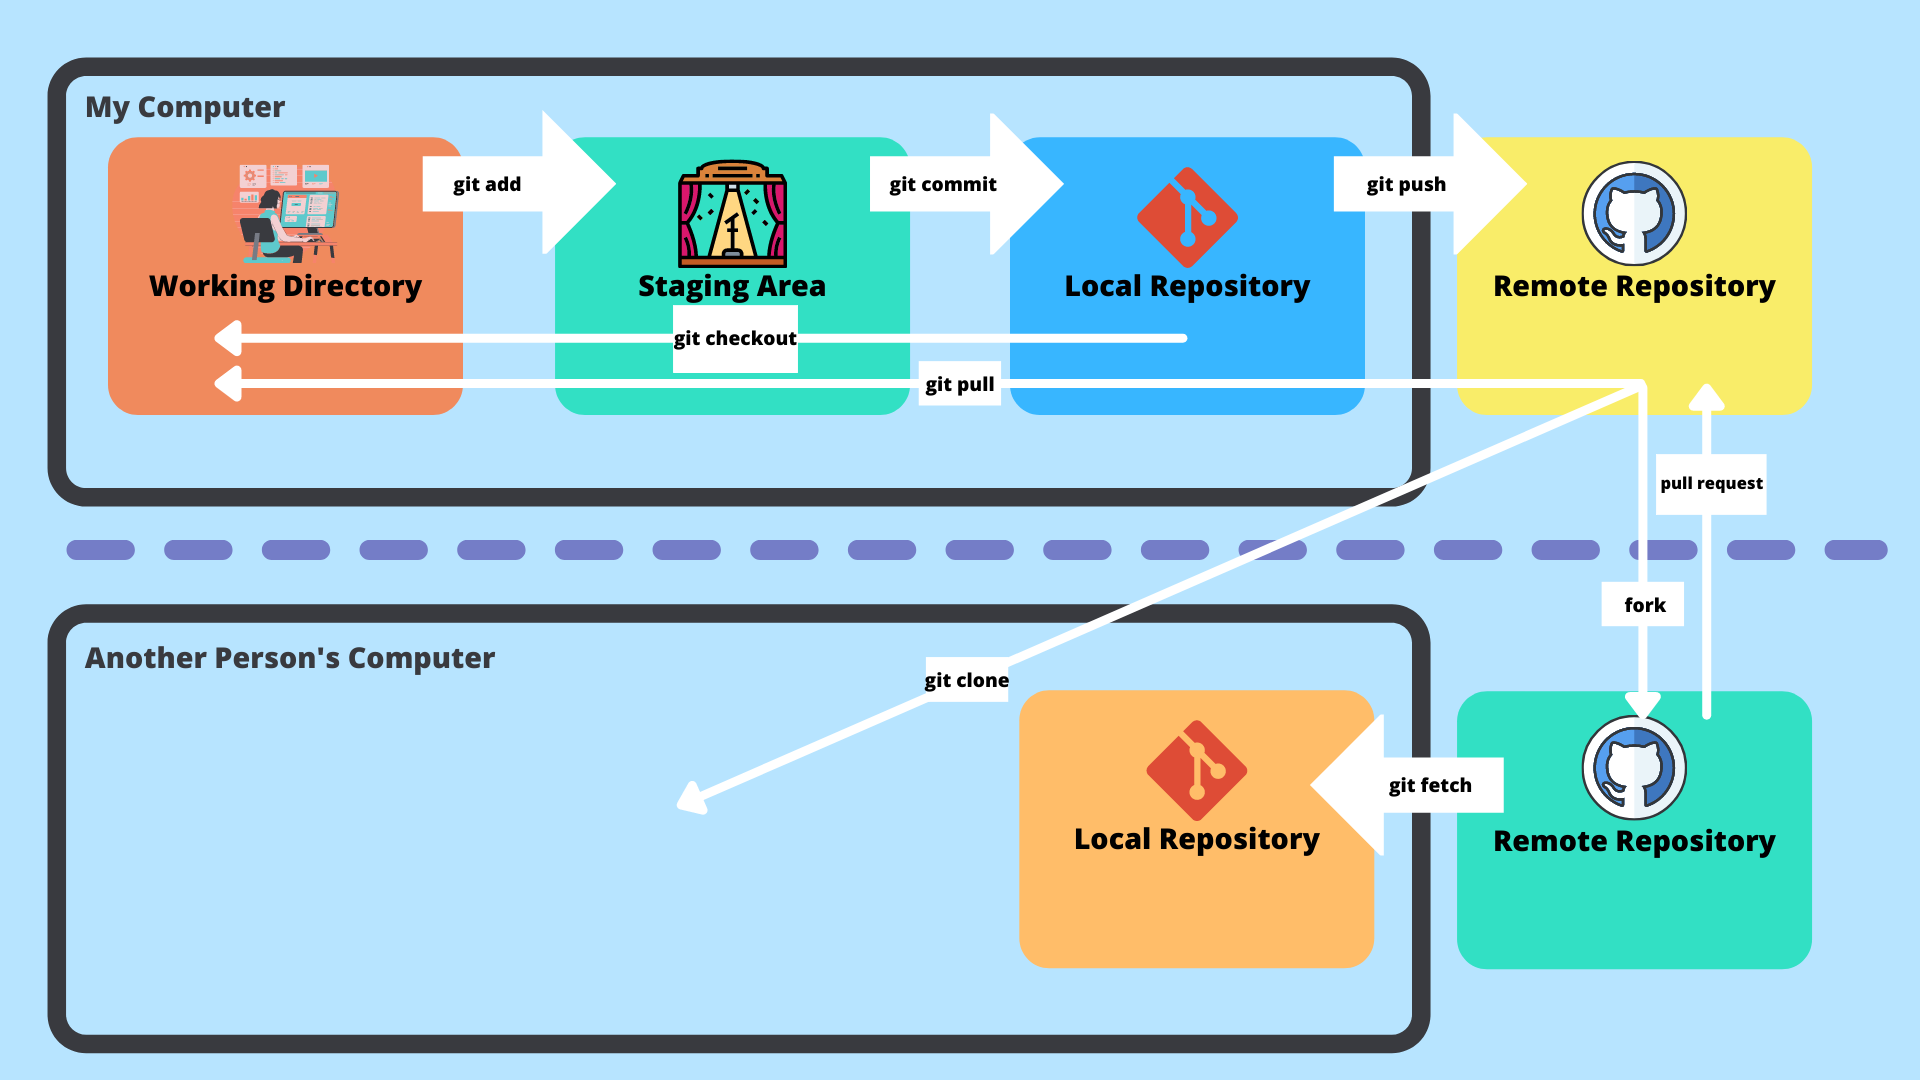
That's all folks! Now, you've become a master of Git and Github. Here's a diagram that summarizes all commands we've looked at.
If you liked this post, it would mean the world to me if you could share it with others who might be interested as well!
Thanks for reading, and see you next time! 👋🏻